Jointing using electro fusion is simple, quick and efficient. Successful joints can be consistently reproduced after very simple training.
Similar procedures are used for all electro fusion systems, energy being provided by an electronic control unit.
The instructions below describe the use of electro fusion for jointing adjacent lengths of pipe.
The instructions apply equally to joining thermoweld fittings to pipe.
Ideally, surfaces should be dry when joining. This is impractical in some situations, e.g. mains repair on insertions. Satisfactory joints can still be achieved in wet conditions providing the water is clean and free from suspended matter or oil. However, coupler joints must not be made in conditons of running water.
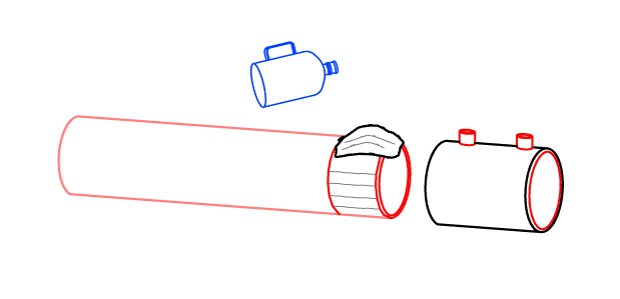
Couplers
| 1. |
Cut pipe square and remove burrs. |
| 2. |
Arrange pipes to be joined so that they are approximately in line and with the ends touching. |
| 3. |
Without removing the protective wrap, place the coupler along side with the pipe ends with the centre line of the fitting with the ends as shown. |
| 4. |
Using a felt tip pen or similar, place a mark on each pipe approximately 20mm out side the extremity of each end of the coupler. |
| 5. |
Place the fitting to one side and thoroughly scrape the outer surfaces of each pipe or thermoweld fitting from the mark to the pipe end, to completely remove the surface layer. |

| 6. |
When using a hand scraper, the operation is simplified by rotating the pipe and scrapping from above. Where rotation is not possible scrapping should start from the under side. |
| 7. |
In the case of mechanical surface preparation tools the instruction supplied by the manufacturers should be followed. |
| 8. |
After preparing the surfaces of both pipes care should be taken to prevent the surfaces from becoming contaminated by grease or other dirt. This can be conveniently achieved by placing a plastic bag over each pipe end. |
| 9. |
Remove the electro fusion fitting from the protective wrapping and fit it on to one of the pipes to which it is to be joined until contact is made with the pipe centre stop. Mark the pipe to show the extremity of the fitting. Then insert the other pipe into the fitting until it reaches the pipe stop and mark that in a similar manner. |
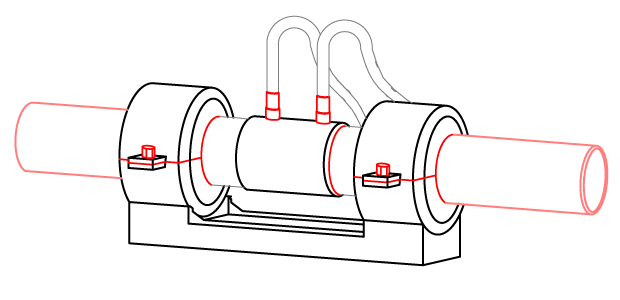
Clamping
| 10. |
Care should be taken to prevent movement of the assembly during the fusion process. The use of welding clamps will minimize the risk of accidental movement and also assist in aligning pipes. |
| 11. |
Remove the terminal protectors and connect the control unit leads to the terminals on the fitting. |
| 12. |
Observe the joining time shown on the fitting. |
| 13. |
Switch on the control unit. Key in the number of seconds required for jointing. check the digital display for confirmation that the correct time has been keyed in. Press the start button. The digital display will progressively reduce as the jointing time elapses. |
| 14. |
Completion of the cycle will be indicated on the control panel. Material should also have risen up the fusion indicator hole adjacent to the terminal shroud, also indicating successful fusion. |
| 15. |
Remove the connection leads and leave the joint undistributed for the cooling period indicated on the fitting. |